Creating a bootable SD card for beaglebone black using fdisk (command line)

In the previous article, we saw how to create a bootable SD card for beaglebone black using gparted tool. In this article, we will try to achieve the same output, but using a command line tool known as fdisk. We will create a bootable SD card using fdisk in this tutorial.
I will be using Ubuntu 22.04 for this tutorial and fdisk for partitioning the SD card. You can choose any size above 8gb for the SD card. Here I will be using a 32gb SD card for this tutorial.
1. Connect the micro SD card to the PC using any card reader.
2. Check if it's detected by either using the sudo dmesg command or the lsblk command.
$ lsblk
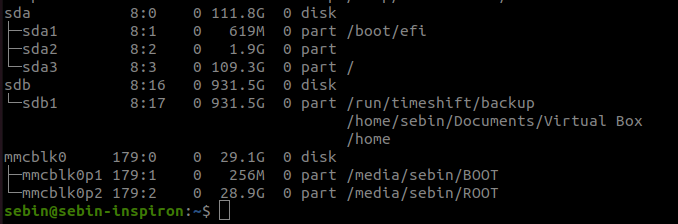 As you can see, my SD card is detected and is the mmcblk0 device. There are already two partitions existing on this device, but no worries as we will remove all existing partitions and create new ones from scratch.
Don't worry if the name of your SD card look's different from mine. It's common to have different names for different SD cards.
3. Unmount any mounted partitions using the umount command.
$ umount /dev/mmcblk0p1
$ umount /dev/mmcblk0p2
Replace mmclblk0p1 and p2 with the respective partition name that shows up in your system. Be careful to umount the individual partitions and not the whole drive itself.
4. Launch the fdisk utitility
You can launch the fdisk utility using the following command
$ sudo fdisk /dev/mmcblk0
Here, use the name of the drive and not the partition names.
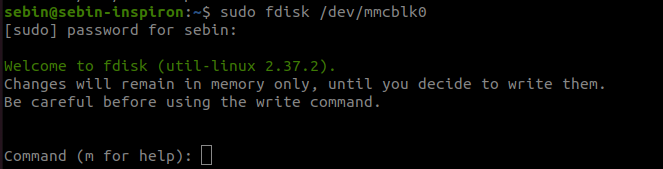 If fdisk is succesfully launched, your terminal should look like this. Now we are not in terminal prompt but inside the fdisk utility.
Use q to quit out of the fdisk utility if needed to quit.
5. Delete all the existing partitions using fdisk utility
In order to delete partions, we need to first see how many partitions are there in our drive. We can do this by pressing p in the fdisk command prompt.
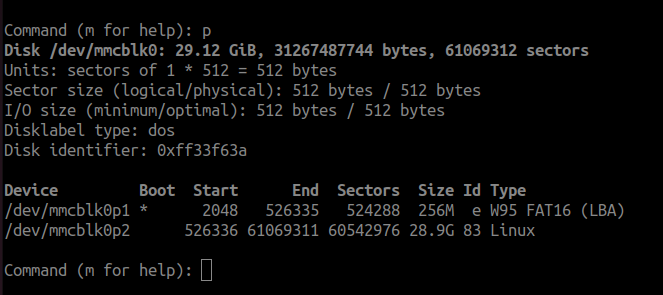 As you can see from the above images, there are 2 partitions that are existing in my SD card. Now we will delete both of these partitions.
In order to delete the partitions, you can use d command. Type d and press enter.
 If there are more than 1 partitions in the drive, fdisk will ask which partition you want to delete. First we will delete partition number 1 and will repeat the same process for partition 2 also.
Use d command to delete all the partitions that you have in your SD card. Move onto the next step after you have finished deleting all the partitions.
6. Create 2 partitions called BOOT and ROOT
Now with the help of fdisk utility, we will be creating two partitions in our SD card. The first partition is a FAT partition (32mb size) and the second partition will be of EXT4 format (any size greater than 4gb is enough).
Creating the BOOT (FAT) Partition
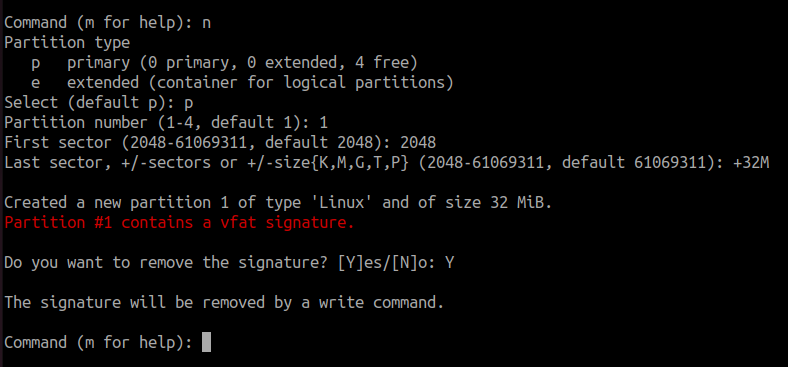
In order to create a new partition, use the n command in fdisk.
Command (m for help): n
After using n command, fdisk will ask you several configurations. Type the following step by step:
Partition type : p
Partition number (1-4, default 1): 1
First sector (2048-61069311, default 2048): 2048
Last sector, +/-sectors or +/-size{K,M,G,T,P} (2048-61069311, default 61069311): +32M
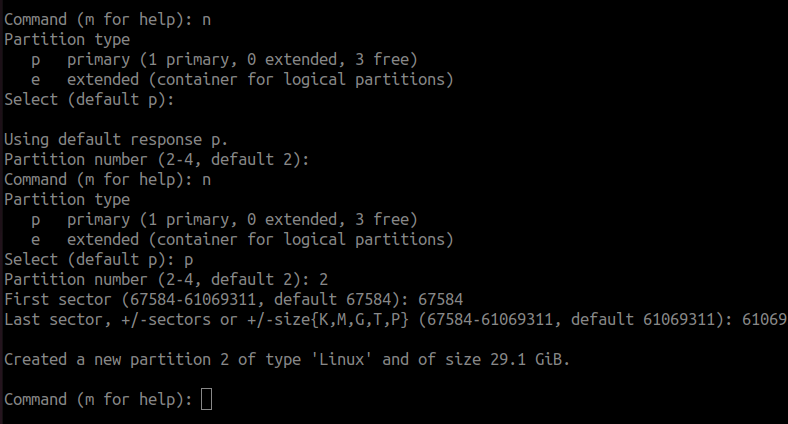
Creating the ROOT (ext4) Partition
We will create the ROOT partition with the remaining free space available. We will again use the n command to create the ROOT partition.
Command (m for help): n
While creating the ROOT partition, you can leave all 4 values as the default value. In order to get the default value, simple press enter.
Partition type : p
Partition number (2-4, default 2): 2
First sector (67584-61069311, default 67584): 67584
Last sector, +/-sectors or +/-size{K,M,G,T,P} (67584-61069311, default 61069311): 61069311 This is the how my screen looked like while creating the second partition.
7. Make the first partition (boot partition) bootable by setting the BOOT flag
Command (m for help): a
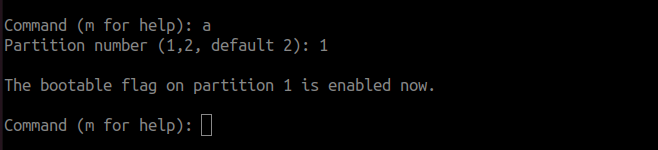
Be sure to select the partition number 1 only.
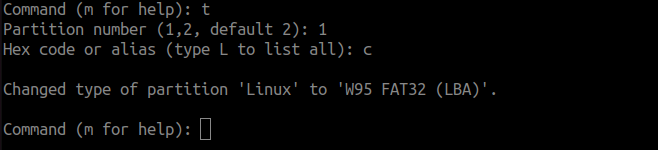
8. Format the first partition with FAT32
Command (m for help): t
Partition number (1,2, default 2): 1
Hex code or alias (type L to list all): c
8. Format the second partition with ext4
Command (m for help): t
Partition number (1,2, default 2): 2
Hex code or alias (type L to list all): 83
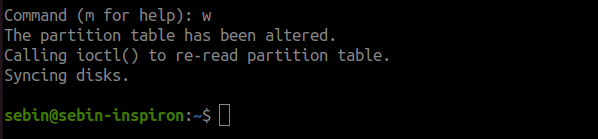
9. Final step: Write all the changes
Command (m for help): w
Setting labels for the partitions
Format the first partition as FAT, using the following command. We will set the label as BOOT so that we know what directory it will be mounted when plugged in.
$ sudo mkfs.vfat -n "BOOT" /dev/mmcblk0p1

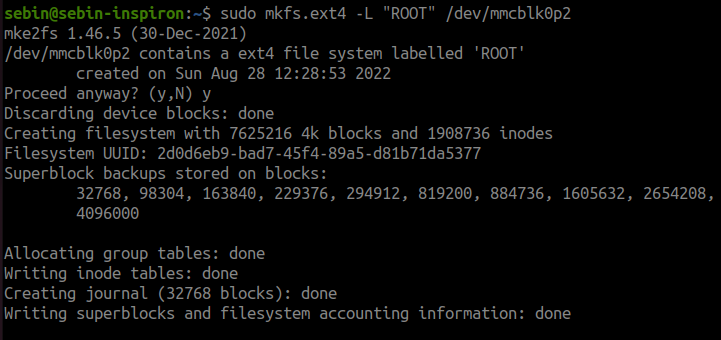
Similarly, format the second parition as an ext4 filesystem using the following command. The label for this parition will be set to ROOT.
$ sudo mkfs.ext4 -L "ROOT" /dev/mmcblk0p2
Summary
In this tutorial, we have now learned how to create a bootable SD card of beaglebone using command line tool. In a previous post, I have also used a graphical tool to achieve the same thing. You can choose whichever method that suits you as both of them gives the same output at the end.


